Mastering the Art of Panoramic Photography: Essential Tips for Perfect Shots
GoogleAds
Panoramic photography allows us to capture vast landscapes, stunning cityscapes, and breathtaking vistas in a single, sweeping shot. However, mastering this art form isn’t as simple as just snapping a picture. From choosing the right equipment to understanding the best techniques, achieving perfect panoramic shots takes skill and practice. In this article, we’ll explore essential tips and tricks to help you elevate your panoramic photography game and capture unforgettable images.
Key Equipment for Panoramic Photography
When it comes to mastering the art of panoramic photography, having the right equipment is essential. Here are some key pieces of gear that every aspiring panoramic photographer should have in their arsenal:
- Wide-Angle Lens: A wide-angle lens is crucial for capturing expansive landscapes in panoramic shots. Look for a lens with a focal length of 35mm or shorter to achieve the best results.
- Tripod: A sturdy tripod is a must-have for panoramic photography, as it helps ensure that your shots are perfectly aligned and free from any camera shake. Make sure to invest in a high-quality tripod for the best results.
- Panoramic Head: A panoramic head is a specialized piece of equipment that allows for smooth and precise rotation of your camera when capturing panoramic images. This is essential for creating seamless and distortion-free panoramas.
- Remote Shutter Release: Using a remote shutter release helps minimize camera shake when taking panoramic shots, resulting in sharper and more professional-looking images. Make sure to use a wireless remote for added convenience.
- Camera with Manual Settings: While not necessarily a piece of equipment, having a camera with manual settings is essential for panoramic photography. Manual control over settings such as aperture, shutter speed, and ISO allows for greater creative control over your shots.
By investing in the right equipment and mastering the techniques of panoramic photography, you can capture stunning landscapes and create breathtaking panoramic images that truly showcase the beauty of the world around us. Remember to practice regularly and experiment with different settings to hone your skills and create the perfect panoramic shots.
Understanding Camera Settings for Panoramic Shots
Camera Settings for Panoramic Shots
When it comes to capturing stunning panoramic shots, understanding your camera settings is key. Here are some essential tips to help you master the art of panoramic photography.
1. Use a Wide-Angle Lens: To capture a wide field of view, opt for a wide-angle lens. This will allow you to include more of the scene in your shot, creating a sweeping panoramic effect.
2. Set your Aperture: When shooting panoramic shots, it’s important to choose the right aperture setting. A smaller aperture (higher f-stop) will increase your depth of field, ensuring that everything in your scene is in focus.
3. Adjust your ISO: To avoid noise in your panoramic shots, keep your ISO as low as possible. This will help you maintain high image quality and clarity in your final images.
4. Use a Tripod: Stability is crucial when shooting panoramic shots, especially if you’re blending multiple images together. Invest in a sturdy tripod to ensure sharp and well-aligned images.

Choosing the Ideal Location for Panoramic Photography
When it comes to capturing breathtaking panoramic shots, choosing the perfect location is crucial. The ideal spot can make all the difference in the world when it comes to creating stunning images that leave a lasting impression. Here are some essential tips to help you master the art of panoramic photography by selecting the perfect location:
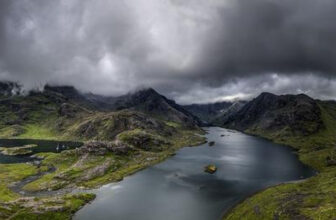
1. Scenic Views: Look for locations that offer expansive and picturesque views. Whether it’s a stunning landscape, a majestic city skyline, or a serene beach, make sure the backdrop is visually appealing and adds depth to your panoramic shot.
2. Elevated Positions: Opt for elevated positions to capture a wider perspective and enhance the sense of scale in your photos. Consider shooting from a hilltop, a rooftop, or a lookout point to get a bird’s eye view of the scene.
3. Interesting Foreground Elements: Incorporate interesting foreground elements such as trees, rocks, or architectural structures to add depth and visual interest to your panoramic shots. These elements can help create a sense of depth and lead the viewer’s eye into the frame.
| Location | Features |
|---|---|
| Mountain Peak | Breathtaking views, rugged terrain |
| Beach | Sandy shores, crashing waves |
4. Natural Light: Pay attention to the quality of light when choosing a location for panoramic photography. Early morning and late afternoon are ideal times to shoot as the golden hour light can add warmth and a magical quality to your images.
5. Accessibility: Consider the accessibility of the location before you set out to shoot. Make sure that the spot is easily reachable and safe to navigate, especially if you’ll be carrying heavy equipment. Plan ahead and scout the location beforehand to ensure a smooth shooting experience.
Techniques for Stitching Panoramic Images
When it comes to capturing breathtaking panoramic images, mastering the art of stitching multiple photos together is key. By seamlessly blending individual shots, you can create stunning wide-angle views that truly showcase the beauty of your surroundings.
One essential technique for stitching panoramic images is to ensure consistency in your shots. This means using the same exposure settings, white balance, and focal length for each photo. Consistency will help create a seamless final image with no visible transitions between frames.
Another important tip is to overlap each shot by at least 30-50%. This overlap provides enough information for stitching software to align the photos accurately. It also helps to prevent gaps or distortion in the final panorama.
When stitching your images together, consider using specialized software such as Adobe Photoshop or PTGui. These programs offer advanced features for aligning and blending photos, resulting in a professional-looking panorama. Experiment with different software options to find the one that best suits your skills and workflow.
Lastly, don’t forget to crop and straighten your panorama after stitching. This step is crucial for achieving a clean, polished final image. By removing any uneven edges or unwanted distractions, you can enhance the overall composition of your panoramic photograph.

Composition Tips for Stunning Panoramic Photos
Basic Composition Guidelines
When capturing panoramic photos, it is essential to pay attention to the composition of your shots. Here are some basic guidelines to keep in mind:
- Use the rule of thirds to create visually appealing compositions.
- Include a strong foreground element to add depth to your shot.
- Consider leading lines to guide the viewer’s eye through the image.
- Avoid cluttered scenes and simplify your composition for a cleaner look.
Choosing the Right Aspect Ratio
The aspect ratio of your panoramic photo can greatly impact its final look. Here are some common aspect ratios to consider:
| Aspect Ratio | Description |
|---|---|
| 3:1 | Traditional panoramic format, great for wide landscapes. |
| 4:1 | Creates a wider view and emphasizes the horizontal plane. |
| 2:1 | Offers a balanced look between height and width. |
Playing with Light and Color
Lighting and color play a crucial role in the overall impact of your panoramic photos. Here are some tips to make the most of these elements:
- Shoot during the golden hour for warm, soft light.
- Experiment with long exposures to capture movement in the scene.
- Enhance colors in post-processing to make your photos pop.
Experimenting with Different Perspectives
Don’t be afraid to get creative with your panoramic shots by exploring different perspectives. Here are some ideas to spark your creativity:
- Try shooting from a low angle to create a unique point of view.
- Experiment with vertical panoramas for a fresh take on traditional landscapes.
- Capture reflections in water bodies for added visual interest.
Refining Your Editing Skills
Post-processing is an essential step in creating stunning panoramic photos. Here are some editing tips to elevate your images:
- Stitch your photos together seamlessly using panorama stitching software.
- Adjust exposure, contrast, and saturation to fine-tune your image.
- Crop your panoramic photo to eliminate distractions and improve composition.

Dealing with Lighting Challenges in Panoramic Photography
When it comes to capturing stunning panoramic shots, mastering the art of dealing with lighting challenges is crucial. The right lighting can make or break your photograph, especially when you’re shooting a wide landscape. Here are some essential tips to help you overcome lighting obstacles and achieve perfect panoramic shots.
1. Time of Day
One of the most important factors in achieving great lighting for panoramic photography is the time of day you choose to shoot. Golden hour, which occurs during the first hour of sunrise and the last hour of sunset, offers soft, warm light that can enhance your panoramic shots. Avoid shooting in harsh midday sun, which can create harsh shadows and blown-out highlights.
2. Use a Graduated ND Filter
A Graduated Neutral Density (ND) filter can help balance the exposure in your panoramic shots when you’re faced with a high dynamic range scene. By darkening the brighter areas of the image, such as a bright sky, while keeping the foreground properly exposed, a Graduated ND filter can help you achieve a more evenly lit panoramic photograph.
3. Bracketing Exposures
Bracketing exposures involves taking multiple shots at different exposure levels to ensure that you capture all the details in a high contrast scene. This technique is particularly useful in panoramic photography, where the lighting conditions may vary across the frame. By blending these exposures in post-processing, you can create a perfectly exposed panoramic shot.
4. Experiment with HDR
High Dynamic Range (HDR) photography involves combining multiple exposures of the same scene to capture a wider range of tones and details. This technique can be especially useful in panoramic photography, where you may be faced with challenging lighting conditions. Experiment with HDR to create stunning panoramic shots with rich, balanced lighting.
5. Post-Processing Techniques
Don’t underestimate the power of post-processing in enhancing the lighting of your panoramic shots. Software tools like Adobe Lightroom offer a range of editing options to adjust exposure, contrast, highlights, and shadows. Fine-tune the lighting in your panoramic photographs to achieve the perfect balance and bring out the details in your shots.

Post-Processing Tips for Perfecting Panoramic Images
When it comes to capturing stunning panoramic images, the real magic often happens during the post-processing stage. With the right techniques and attention to detail, you can elevate your panoramic shots from good to truly breathtaking. Here are some essential post-processing tips to help you perfect your panoramic images:
1. Stitching Software: Use reliable stitching software to seamlessly blend multiple images together. Programs like Adobe Photoshop, Lightroom, or specialized software like PTGui can help you create a cohesive panoramic image without visible seams or distortions.
2. Crop and Straighten: After stitching your images together, crop the panoramic image to remove any uneven edges or distractions. Use the straighten tool to align the horizon and ensure that your image looks balanced and well-composed.
3. Color Correction: Adjust the color tones and white balance of your panoramic image to enhance its visual appeal. Use tools like curves, levels, or color balance to fine-tune the colors and make your image pop.
4. Sharpening: Apply sharpening techniques to enhance the details and clarity of your panoramic image. Use the sharpen tool or apply selective sharpening to specific areas of interest to make them stand out.
5. Final Touches: Add finishing touches to your panoramic image by adjusting contrast, saturation, and exposure. Experiment with different filters or presets to give your image a unique look and feel. Don’t be afraid to get creative with your post-processing to make your panoramic images truly unforgettable.
Q&A
Q: What are some essential tips for capturing perfect panoramic shots?
A: To master the art of panoramic photography, it is important to choose the right location with a clear view and interesting subject matter. Use a sturdy tripod to minimize camera shake and ensure a level horizon. Additionally, overlap each shot by about 30% to allow for seamless stitching in post-processing.
Q: How can photographers ensure proper exposure in panoramic shots?
A: To maintain consistent exposure across the panoramic image, use manual mode and set the exposure for the brightest part of the scene. Consider bracketing exposures to capture a range of tones and blend them together in post-production.
Q: What software is recommended for stitching panoramic images together?
A: There are several software options available for stitching panoramic images, such as Adobe Photoshop’s Photomerge feature, PTGui, Hugin, and Microsoft ICE. Experiment with different programs to find the one that best suits your workflow and produces high-quality results.
Q: Are there any composition techniques specific to panoramic photography?
A: When composing a panoramic shot, consider using leading lines to draw the viewer’s eye through the scene. Incorporate elements in the foreground to create depth and add interest. Experiment with different aspect ratios, such as 2:1 or 3:1, to create a panoramic image that is visually appealing.
Q: What are some common mistakes to avoid when shooting panoramic images?
A: Avoid moving subjects or objects that can cause stitching errors in the final image. Be mindful of lens distortion and ensure that the horizon line remains straight throughout the panoramic sequence. Pay attention to lighting conditions and adjust your settings accordingly to avoid overexposed or underexposed areas in the final image.
To Conclude
In conclusion, mastering the art of panoramic photography requires patience, practice, and attention to detail. By following these essential tips, you can capture stunning panoramic shots that will impress even the most discerning of viewers. So get out there, explore your surroundings, and watch as your photography skills reach new heights with every breathtaking panoramic shot you take. Happy shooting!
GoogleAds