Mastering the Art of Night Photography: Essential Tips for Capturing Stunning Shots
GoogleAds

Night photography can be a challenging but rewarding pursuit for any photographer. From capturing the twinkling lights of a city skyline to the serene beauty of a starry night sky, the possibilities for stunning shots are endless. In this article, we will explore essential tips and techniques for mastering the art of night photography and capturing truly breathtaking images in low light conditions. Whether you’re a beginner or a seasoned pro, these tips will help take your nighttime photography skills to the next level.
Choosing the Right Gear for Night Photography
When it comes to mastering the art of night photography, choosing the right gear is essential. The equipment you use can make a huge difference in the quality of your photos. Here are some essential tips for selecting the best gear for capturing stunning shots in low light conditions.
Camera: Invest in a camera with a high ISO range to capture clear and sharp images in low light. Look for a camera body with low noise performance at high ISO settings.
Lenses: Use fast lenses with a wide aperture (f/1.8 or wider) to let in more light and create beautiful bokeh effects. Prime lenses are great for night photography as they tend to have wider apertures than zoom lenses.
Tripod: A sturdy tripod is a must-have for night photography to keep your camera steady during long exposures. Look for a tripod with a ball head for easy adjustments and quick setup.
Remote Shutter Release: To avoid camera shake when taking long exposures, use a remote shutter release or self-timer function. This will help you capture sharp and clear images without any blur.
Understanding Camera Settings for Low-Light Conditions
Mastering the Art of Night Photography: Essential Tips for Capturing Stunning Shots
When it comes to capturing breathtaking night photography, is crucial. With the right knowledge and techniques, you can take your nighttime shots to a whole new level. Here are some essential tips to help you master the art of night photography:
Use a Tripod
One of the key elements to capturing sharp and clear night shots is to use a tripod. This will help stabilize your camera and prevent any blurriness caused by shaky hands. Make sure to invest in a sturdy tripod that can support the weight of your camera and lens.
Adjust Your ISO
When shooting in low-light conditions, it’s important to adjust your ISO settings accordingly. Increasing the ISO will make your camera sensor more sensitive to light, allowing you to capture brighter images. However, be cautious as high ISO settings can introduce noise and graininess to your photos. Find the right balance for your specific shooting situation.
Experiment with Shutter Speed
Shutter speed plays a critical role in night photography. A longer shutter speed allows more light to enter the camera, resulting in brighter images. However, using a slow shutter speed can also introduce motion blur if you’re capturing moving subjects. Experiment with different shutter speeds to find the perfect balance between brightness and sharpness.
Use Manual Focus
In low-light conditions, your camera’s autofocus may struggle to lock onto subjects. To ensure your shots are sharp and in focus, switch to manual focus and adjust the focus ring yourself. Take your time to fine-tune the focus until your subject is crystal clear in the frame.
| Camera Setting | Recommended Range |
|---|---|
| Aperture | f/2.8 – f/5.6 |
| ISO | 800 – 3200 |
| Shutter Speed | 1/30 – 30 seconds |
Utilizing Long Exposure Techniques for Creative Effects
Long Exposure Techniques
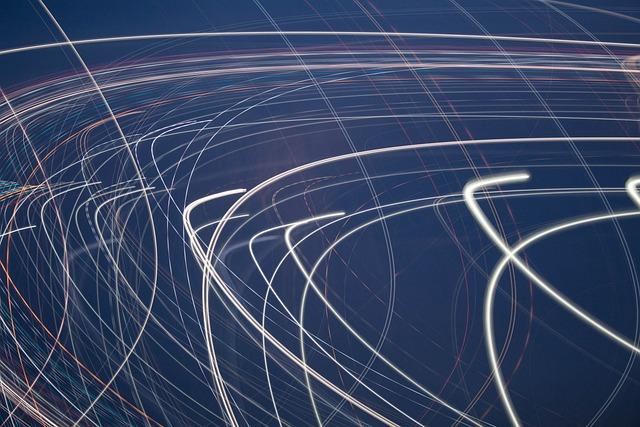
Long exposure photography involves using a slow shutter speed to capture stationary elements in motion, creating stunning visual effects. One popular technique is light trails, where moving lights leave a trail of light in the image. To achieve this effect, set your camera to a slow shutter speed, experiment with different exposure times, and use a tripod to keep the camera steady.
Another creative long exposure technique is light painting, where you use a light source to paint light onto your scene. This can add a unique and artistic flair to your photos. To try this technique, set your camera to a long exposure, use a flashlight or other light source to paint light onto your subject, and experiment with different colors and patterns.
Essential Tips for Mastering Night Photography
- Use a tripod to keep your camera steady during long exposure shots.
- Experiment with different shutter speeds to achieve the desired effect.
- Consider using a remote shutter release to prevent camera shake.
- Shoot in RAW format to capture more detail and allow for greater flexibility in post-processing.
Recommended Gear for Night Photography
| Item | Description |
|---|---|
| Fast prime lens | Allows more light into the camera for clearer night shots. |
| External flash | Can help illuminate your subject in low light conditions. |
| Lightweight tripod | Essential for long exposure shots to prevent camera shake. |
| Remote shutter release | Allows you to trigger the camera without touching it, reducing shake. |
Post-Processing Tips for Night Photography
After capturing your images, post-processing can enhance the final result. Adjusting exposure, contrast, and white balance can help bring out the details in your night shots. Experiment with different editing techniques to create a unique and stunning final image.
Finding the Best Locations for Night Photography
When it comes to mastering the art of night photography, one of the key factors to consider is finding the best locations to capture stunning shots. Whether you’re a beginner or a seasoned pro, choosing the right spot can make a huge difference in the outcome of your photos. Here are some essential tips to help you find the perfect locations for night photography:
Urban Landscapes: Urban areas are great for night photography due to the abundance of artificial light sources. Look for iconic landmarks, cityscapes, and streets bustling with activity to capture the vibrant energy of the city at night.
Natural Settings: While urban landscapes offer a unique charm, natural settings can provide a tranquil backdrop for night photography. Seek out locations with minimal light pollution, such as parks, forests, or bodies of water, to capture the beauty of the natural world under the night sky.
Historical Sites: Historical sites often come alive at night, with architectural details illuminated by strategically placed lights. Explore castles, monuments, and ruins to capture the timeless beauty of these locations under the stars.
Waterfronts: Waterfronts offer a dynamic setting for night photography, with the reflection of lights on the water creating a mesmerizing effect. Capture the interplay of light and water at harbors, riversides, or beaches for a stunning visual impact in your photos.
Mastering Light Painting and Light Trails
When it comes to capturing stunning shots at night, mastering the art of light painting and light trails can take your photography skills to the next level. By understanding how to use light creatively, you can create mesmerizing and unique images that stand out from the crowd.
One essential tip for capturing stunning light painting shots is to use a sturdy tripod to keep your camera steady. This will allow you to use long exposure times without worrying about camera shake, resulting in crisp and clear images. Additionally, using a remote shutter release can help minimize any vibrations when taking the shot.
Experimenting with different light sources is key to creating dynamic light painting images. Try using tools such as flashlights, light sticks, or even sparklers to add interesting shapes and patterns to your photos. By playing with the distance, angle, and intensity of the light source, you can achieve unique and captivating results.
When it comes to capturing light trails, finding the right location is crucial. Look for busy streets, highways, or areas with traffic lights to capture the movement of cars and create beautiful streaks of light. Experiment with different exposure times to achieve the desired effect, whether you want long, flowing trails or short, sharp lines.
Remember, practice makes perfect when it comes to . Don’t be afraid to experiment, try new techniques, and push the boundaries of your creativity. With time and dedication, you’ll be able to capture stunning shots that showcase the beauty of light in the darkness.
Tips for Achieving Sharp Focus in Dark Settings
When shooting in dark settings, achieving sharp focus can be a challenging task for photographers. However, there are several tips and techniques that can help you master the art of night photography and capture stunning shots. Here are some essential tips to ensure you get the perfect focus every time:
- Avoid using autofocus: In low light situations, autofocus can struggle to lock onto a subject. Instead, switch to manual focus and use the magnification feature on your camera to ensure precision.
- Use a tripod: To minimize camera shake and keep your shots sharp, it’s crucial to use a sturdy tripod. This will allow you to use slower shutter speeds without sacrificing image quality.
- Adjust your aperture: In dark settings, using a wider aperture (lower f-stop number) can help let in more light and improve focus. Experiment with different apertures to find the perfect balance between light and sharpness.
- Focus on contrast: Look for areas of high contrast in your scene, such as where light meets darkness. By focusing on these areas, you can help your camera lock onto the subject more easily.
- Use manual settings: Take control of your camera’s settings to fine-tune the focus in dark settings. Adjust your ISO, shutter speed, and aperture manually to achieve the desired sharpness in your images.

Post-Processing Techniques for Enhancing Night Photos
When it comes to capturing stunning night photos, mastering the art of post-processing is essential. In this section, we will explore some advanced techniques for enhancing your night shots and taking them to the next level.
One of the key is adjusting the exposure. Night shots often require longer exposure times to capture enough light, which can result in overexposed areas or too much noise. By adjusting the exposure in post-processing, you can balance the brightness levels and bring out the details in the shadows.
Another important post-processing technique is adjusting the white balance. Night photos can have a bluish or yellowish tint due to artificial lighting or moonlight. By fine-tuning the white balance, you can correct these color casts and achieve more accurate and natural-looking colors in your night shots.
Adding contrast to your night photos can also make a big difference in the overall impact of the image. By increasing the contrast in post-processing, you can make the lights and shadows more pronounced, enhancing the depth and details in your night shots.
Lastly, don’t forget to sharpen your night photos in post-processing to ensure they look crisp and clear. Night shots tend to be more susceptible to noise and softness, so applying a subtle amount of sharpening can help bring out the finer details and make your night photos pop.
Q&A
Q: Why is night photography considered challenging?
A: Night photography requires a different set of skills and techniques compared to shooting in daylight, such as longer exposure times and working with low light conditions.
Q: What equipment is essential for night photography?
A: A tripod is crucial to stabilize the camera during long exposures, while a fast lens with a wide aperture is important for capturing more light in dark conditions. Additionally, a remote shutter release can help prevent camera shake.
Q: How can one achieve sharp focus in low light conditions?
A: Use manual focus and the camera’s live view mode to fine-tune focus, or utilize techniques like focus stacking to ensure sharpness throughout the image.
Q: What settings are recommended for night photography?
A: Start with a low ISO setting to reduce noise, a wide aperture to let in more light, and a slow shutter speed for long exposures. Experiment with different settings to achieve the desired effect.
Q: How can light sources be utilized creatively in night photography?
A: Incorporate light trails from cars, create silhouettes against bright city lights, or use light painting techniques to add visual interest and drama to your night shots.
Q: What post-processing techniques are useful for enhancing night photography?
A: Adjusting exposure, white balance, and contrast can help bring out details in the shadows and highlights. Additionally, noise reduction and sharpening can improve overall image quality.
Concluding Remarks
In conclusion, mastering the art of night photography can be a daunting task, but with practice and the right techniques, you can capture stunning shots that truly stand out. By utilizing these essential tips and investing in the proper equipment, you can elevate your night photography skills and create captivating images that leave a lasting impression. So go out there, experiment, and let your creativity shine through the darkness. Happy shooting!
GoogleAds