Mastering HDR Photography: Essential Tips for Stunning Images
GoogleAds

High Dynamic Range (HDR) photography has become increasingly popular among photographers looking to capture stunning images with enhanced details and vibrant colors. By combining multiple exposures of the same scene, HDR photography creates a final image that showcases a wider range of tones and textures. In this article, we will explore essential tips and techniques for mastering HDR photography, allowing you to elevate your images to the next level.
Understanding HDR Photography
High Dynamic Range (HDR) photography is a technique that allows photographers to capture a wider range of luminance levels than is typically possible with standard photography. By blending multiple exposures, HDR images can showcase detail in both the shadows and highlights, creating stunning and dynamic photographs.
One essential tip for mastering HDR photography is to use a tripod to ensure that your multiple exposures align perfectly. This will prevent any ghosting or blurriness in your final image, resulting in a clean and sharp photograph. Additionally, using a remote shutter release or timer can help minimize camera shake and ensure optimal image quality.
When capturing multiple exposures for HDR photography, it is important to vary your exposure settings to capture a wide range of luminance levels. Experiment with different exposure values to ensure that you have enough detail in both the highlights and shadows of your image. This will give you more flexibility when blending your exposures in post-processing.
Post-processing is a crucial step in HDR photography. Use software like Adobe Lightroom or Photoshop to blend your multiple exposures and fine-tune the tonal range of your image. Adjust the highlights, shadows, and contrast to create a balanced and visually pleasing photograph. Remember to keep the final result looking natural and realistic.
Mastering HDR photography takes practice and patience. Be prepared to experiment with different techniques and settings to find what works best for you. Don’t be afraid to push the boundaries and explore creative possibilities with HDR photography. With dedication and perseverance, you can capture stunning and captivating images that showcase the beauty of the world in all its dynamic range.
Choosing the Right Equipment
When it comes to mastering HDR photography, one of the most crucial aspects is . The tools you use can greatly impact the quality of your images, so it’s important to select gear that will help you achieve stunning results.
Camera: A camera with manual settings is essential for HDR photography. Look for a DSLR or mirrorless camera that allows you to control settings such as aperture, shutter speed, and ISO. This level of control is necessary for capturing multiple exposures and blending them into a single HDR image.
Lens: A wide-angle lens is ideal for capturing landscape scenes in HDR. Look for a lens with a focal length between 10-24mm to achieve a broad perspective and capture more detail in your shots.
Tripod: Stability is key when shooting HDR images, as even the slightest movement can cause blurriness in the final result. Invest in a sturdy tripod to keep your camera steady during long exposures, ensuring sharp and clear images.
Remote Shutter Release: To further eliminate camera shake, consider using a remote shutter release to trigger the shutter without physically touching the camera. This accessory is especially useful for capturing bracketed shots for HDR processing.

Setting the Proper Exposure Bracketing
Mastering the proper exposure bracketing is essential for capturing stunning HDR images. By setting the exposure bracketing correctly, you can ensure that you capture a range of exposures that will provide you with the best possible image quality.
One key tip for is to consider the dynamic range of the scene you are photographing. If the scene has a high dynamic range, you may need to increase the number of bracketed exposures to capture all the details in highlights and shadows.
Another important factor to consider when setting the exposure bracketing is the spacing between each bracketed exposure. A common spacing setting is around 1 to 2 stops, but this can vary depending on the scene and the effect you want to achieve.
When setting the exposure bracketing, it’s also important to pay attention to the order in which the exposures are captured. By starting with the correct exposure and then bracketing around that point, you can ensure that you have a well-exposed image to work with in post-processing.
Overall, mastering exposure bracketing is crucial for capturing stunning HDR images. By considering the scene’s dynamic range, spacing between exposures, and the order in which they are captured, you can elevate your photography to the next level and create breathtaking images that truly stand out.
Using HDR Software for Post-Processing
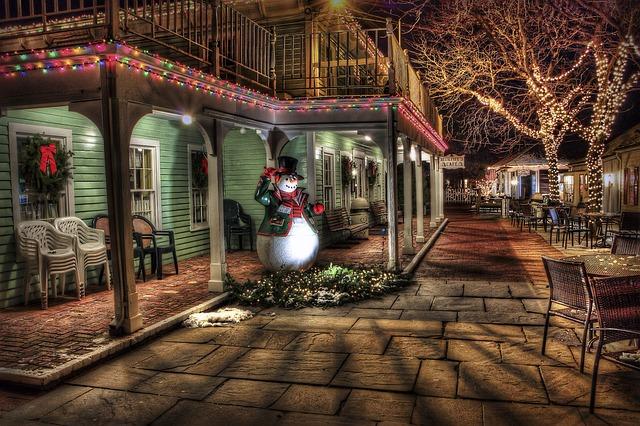
When it comes to creating stunning HDR images, using the right software for post-processing is essential. HDR software allows photographers to blend multiple exposures of the same scene to create a final image with a wide dynamic range. This technique helps to capture the full range of tones and details in a scene, resulting in dramatic and eye-catching photographs.
One of the key benefits of using HDR software is the ability to fine-tune the tonal range of an image. With tools like tone mapping and exposure blending, photographers can adjust the highlights, shadows, and mid-tones to achieve the desired look and feel. This level of control is crucial for creating images that pop and grab the viewer’s attention.
When , it’s important to keep a few key tips in mind. First, be mindful of the natural look of the final image. While HDR can create vibrant and dynamic photos, it’s important to avoid over-processing the image to the point where it looks unrealistic. Striking a balance between realistic and dramatic is key.
Another essential tip is to experiment with different settings and presets. HDR software often comes with a variety of presets that can help streamline the post-processing workflow. However, don’t be afraid to customize these presets or create your own to achieve a unique and personalized look for your images.
Lastly, remember that practice makes perfect. HDR photography and post-processing can be complex processes, but with time and dedication, you can master the art. Take the time to learn the ins and outs of your chosen HDR software, experiment with different techniques, and don’t be afraid to push the boundaries of your creativity.

Adjusting Tone Mapping for Natural Results
When it comes to capturing stunning HDR images, adjusting tone mapping is a crucial step in achieving natural and realistic results. Tone mapping allows you to balance the exposure and contrast levels in your photos to ensure that they look true to life.
One essential tip for mastering tone mapping is to start with a good base image. Make sure that your original photo has a wide dynamic range and captures all the details in the highlights and shadows. This will provide you with a solid foundation for adjusting the tone mapping settings.
Experiment with different tone mapping algorithms to find the one that best suits the look you want to achieve. Some popular options include:
- Reinhard
- Mantiuk
- Fattal
Pay attention to the histogram of your image while adjusting the tone mapping settings. Aim to distribute the tones evenly across the histogram to avoid overblown highlights or crushed shadows. This will help you maintain a balanced and natural look in your HDR photos.
| Tone Mapping Algorithm | Best Use Case |
|---|---|
| Reinhard | Landscape photography |
| Mantiuk | Architectural photography |
| Fattal | Portrait photography |

Avoiding Overly Dramatic Effects
When it comes to HDR photography, it’s important to strike a balance between enhancing the dynamic range of your images and . While HDR can add depth and richness to your photos, going overboard with the editing can result in unnatural and unappealing visuals.
Here are some essential tips for in your HDR photography:
- Avoid pushing the sliders too far: When editing your HDR images, it can be tempting to crank up the contrast, saturation, and clarity settings to make the photo pop. However, overdoing it can result in a garish and artificial look. Instead, make subtle adjustments to enhance the details without going overboard.
- Use a light touch with the HDR effect: The purpose of HDR photography is to capture a wide range of tones and details in a scene. While it’s important to bring out the shadows and highlights, be mindful of creating a natural and balanced look. Dialing back the intensity of the HDR effect can help achieve a more realistic result.
- Pay attention to color saturation: HDR processing can sometimes lead to oversaturated colors, especially in areas of high contrast. To avoid this, carefully adjust the vibrance and saturation levels to ensure that the colors appear vibrant yet natural. Consider desaturating certain tones if they appear too intense.
Additionally, it’s important to consider the overall composition and lighting of your image. While HDR can enhance the details in a scene, it’s essential to start with a strong composition and good lighting to create a visually appealing photo. Experiment with different angles, framing, and lighting conditions to capture the essence of the scene.
| Practice | Patience |
|---|---|
| Developing | Skills |
| Experimenting | Learning |

Experimenting with Different Lighting Conditions
When it comes to mastering HDR photography, one of the key factors to consider is . By understanding how light interacts with your subjects, you can capture stunning images that truly stand out. Here are some essential tips to help you take your HDR photography to the next level:
1. Golden Hour Magic: Take advantage of the soft, warm light during the golden hour – the hour after sunrise or before sunset. This type of light can add a beautiful glow to your images and create a dreamy, ethereal effect.
2. Harsh Light Challenges: While harsh light can be tricky to work with, it can also create dramatic and dynamic photos. Experiment with different angles and settings to find the best way to capture the intense contrast and shadows.
3. Indoor vs. Outdoor: Don’t limit yourself to only shooting outdoors. Indoor settings can offer unique lighting opportunities, such as soft, diffused light from windows or dramatic shadows from artificial lighting.
4. Experiment with Artificial Light: Don’t be afraid to play with artificial lighting sources, such as LED lights or flash. These can add a creative touch to your images and help you achieve the desired mood or atmosphere.
Q&A
Q: What is HDR photography and why is it important?
A: HDR photography stands for High Dynamic Range photography. It involves capturing multiple photos of the same scene at different exposures and blending them together to create an image with a greater range of tones and detail. HDR photography is important because it allows photographers to capture a scene as closely as possible to how the human eye perceives it.
Q: What are some essential tips for mastering HDR photography?
A: Some essential tips for mastering HDR photography include using a tripod to ensure consistent framing, shooting in RAW format for maximum editing flexibility, adjusting the exposure manually to capture the full dynamic range of the scene, and using bracketing to capture multiple exposures.
Q: How can post-processing software enhance HDR images?
A: Post-processing software such as Adobe Lightroom or Photoshop can enhance HDR images by allowing photographers to blend multiple exposures, adjust contrast and saturation, correct color balance, and fine-tune details to create a stunning final image.
Q: Are there any common mistakes to avoid when shooting HDR photography?
A: Some common mistakes to avoid when shooting HDR photography include over-processing the image, using too many exposures, not using a tripod for stability, and forgetting to adjust the white balance for each exposure.
Q: What are the benefits of mastering HDR photography for photographers?
A: Mastering HDR photography can help photographers create more dynamic and visually stunning images, enhance details in shadows and highlights, and showcase a scene’s full range of tones and colors. It can also open up new creative possibilities and challenge photographers to push their technical skills to the next level.
To Conclude
In conclusion, mastering HDR photography can greatly enhance the quality of your images by capturing a wider range of light and detail. By following these essential tips and techniques, you can create stunning and visually striking photos that truly stand out. So go out there, practice, and let your creativity shine through your HDR photography. Happy shooting!
GoogleAds


